HomeAbout MeTips and TutorialsCaromal Colors

Vintage Event

 Hello Friends,
I had so much fun, Saturday, I did Demo's  using Caromal Colours, I am still learning how versatile this paint is, and how to achieve different looks.


I painted some new samples, with summer in mind, light colored summer hues. Displayed in a large bread bowl, painted, distressed, all with Caromal Colours finishes.


Some little vignettes in my shop. Really it's my little space in our local antique shop.
I've decided I'm calling it "my petite shop", cause 
that's how I feel about it.
Tin water can and petite tool box,
painted with Paprika basecoat,  (2) Chipping Cream, 
(3) Bayberry, then sand with 220 grit sandpaper,
last with semi dry chip brush, Wysteria basecoat  
applied here and there in streaks, and stipple.

Remember? 
No Prep- NO Prime NO Sanding
Bonds to almost anything!
You also can get a two color
chippy barn wood finish!
A-Maze-ING!
Next project, I 'll take photos as I go,
  you'll see how easy and fun
Caromal Colours is to use,
Lord knows, my garage, and (2) workrooms
have vintage finds waiting for a breath of new life.
My Studio ( Atelier) French for studio,
(don't you just love the French,
sounds so Romantic)

If you'd like to learn more and order Caromal Colours,
click Caromal Colours at top of page to visit my site Bushwoodart.com
If you go to Caromal Colours.com, let these fine folks know you heard about them from me, 
just enter  jan   under coupon code, you'll get a discount in shipping, and I'll get credit!

Until next time-


Posted by Picasa

Redesigned Finds

Hey there,
I've taken a little redirection with my art and time.
Last year I became a rep for Country Living's Caromal Colours.
I didn't do much with it at the time,
cause I was so into creating my dolls.
I'm not giving up doll making, just acting on another passion.

Fabulous finds, upcycled, and painted with Caromal Colours.

The best part about Caromal Colours is, you don't have to sand or prime before painting. It bonds to almost anything and is very durable.
 These are ready to go to  my space I've rented  at our local antique shop,
Antiques Downtown, Elk River, MN.

 I have another blog about Caromal Colours, http://BushWoodArt.com but it's on WordPress, and I'm so busy painting and finishing pieces with Caromal Colours, and still working part time at the hospital, I haven't had time to learn how to use it! So, I decided to do what I know how to do, and here I am, posting about CC here. But if you want more info on Caromal Colours, please order through my other web site. You will get a discount in shipping, and I will get credit. Thanks!

The tool box was painted with Paprika basecoat, chipping cream. and bayberry basecoat,
then I dry brushed some Parchment basecoat.
I added some tin squares to a flower box, and painted it with Caromal Colours Reclain- white.
I have been a antique, thrift shop. estate sale, garage sale junkie since I was a wee one.
Lucy, my mom got me into it.
It drives my husband John, crazy. He's one of those people who just don't get it.
But he loves me, so he puts up with it.
He cringes, every time he walks in our garage.
I don't blame him. I started out with a 12' X 10' room in our lower level, bead board walls, great lighting and tons of shelves. Then when our last son moved out, I took over the family room, 21' X 20', and now the garage! It's only temporary, I am planning on just working out of the family room/work room/studio.
Vintage mounding with iron hangers.
Last but not least, a little vintage romance, a pretty altered hand mirror.
Well, I'm off to deliver these to my shop space.

You can also buy Caromal Colours on Etsy, click on the right side bar, top of page.
I am in the process of listing all the colors, one more thing to add to my "to do" list!


Posted by Picasa

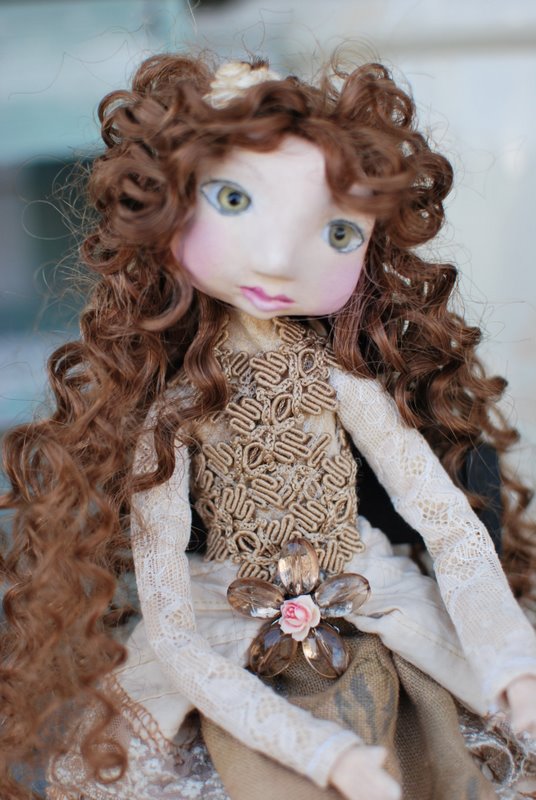
Sweet New Doll

I just finished this doll, 
she is reserved on Etsy for someone, 
but I wanted you to see her.
The customer who ordered her
wanted the long red locks she had seen on a previous doll I created.
Her arms and legs have a light wire armature, for positioning.
She is sculpted from paper clay, I have two other dolls in progress,
that have been waiting patiently for make up and ward robe.
I am happy with how she evolved.
But adding the hair, is still something,
I'm working to get better at.
I used synthetic hair (I think)
possibly real human hair,
I can't remember, and I threw away the packaging.
I cut it from a weft,
then used Fabritac glue (I hate that stuff)
to glue lock by lock.
It always globs up, gets dried out, and is stringy.
Anybody use something different,
Let me know,
I'd really appreciate it.


Happy Doll Making
XOXO


Enhanced by Zemanta

LinkWithin

Related Posts Plugin for WordPress, Blogger...